Tutorials

Free Clipart Picture of a Pair of Blue Scissors. Click Here to Get Free Images at Clipart Guide.com
Showing posts with label Recycling/Reusing. Show all posts

Thursday, February 4, 2010

Tutorial 10--Junk Mail Valentine

I hope this little card
Brightens up your day.
I made it out of junk mail
So don't throw it away.


I donated the 3 cards above to Etsy's Special Delivery Project.


In Tutorial 2, I showed how you could make a Christmas card out of junk mail, by using a method known as iris folding.  Since Valentine's Day is just around the corner, in this tutorial, I will make a Valentine's Day card using free templates on the web to speed the process up; however, the templates require that you work on the iris folding from the back of the card, so it is more difficult to spot mistakes if you are using junk mail.  This tutorial will be easier to understand if you have already done Tutorial 2.  Instead of junk mail, you can use wrapping paper, origami paper, or ribbons.  


The rightmost card below was made using junk mail advertisements for plaid shirts.  It would be a nice, not-too-sissy Valentine's Day card to give to a man.


Tutorial
Making an iris folding Valentine's Day card out of junk mail, using a template (this tutorial is for the card in the center).


Difficulty Level
Very easy

Time Taken
I hour


Materials

  • Thick paper for the card (I used 67 lb cover stock)--one large piece and one half its size
  • Junk Mail, unwanted magazine, used wrapping paper, or any other pretty paper
  • Scotch tape
  • Glue
  • Scissors
  • Ribbon or string
  • Color pencil
  • Optional--Compasses, bowl or some circular object for drawing a circle


Instructions
Step 1)  Fold the large sheet of thick paper into half.  If the paper is too large for the card, cut it to an appropriate size.  I cut mine to 6.2 inches (1.5 cm) by 4.5 inches (11.3 cm) before folding.


Step 2)  Cut a piece of thick paper (I used the same cover stock) to the same size as the front of the card (i.e. half the size of the paper in Step 1).  This will be the frame of the card.


Step 3)  Draw half a heart on a separate piece of paper.  I used the compasses to draw a circle.


Step 4)  Cut the half a heart out.


Step 5)  Draw half a heart on the frame from Step 2.  Flip the half heart piece and use it to draw the opposite side of the heart.  Make sure the heart is centered.


Step 6)  Cut the heart shape out of the card stock.


Step 7)  Print this template out.  The template was too small for the heart I had cut, so I drew extra lines, extending the pattern on the template.


Step 8)  Tape the frame onto the template, so that the iris is in the center of the heart.  Note that you are looking at the back of the frame.  The heart covered some of the numbers up, so I rewrote them within the same triangle, in a position where I could see them.


Step 9)  Cut out pictures with pretty colors from the junk mail.  Since this is a Valentine's Day card, I cut out pictures with lots of red, purple and pink.


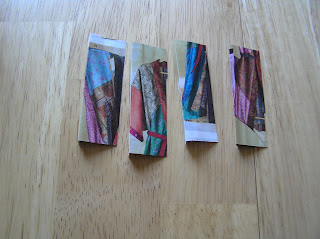
Step 10)  Cut out a sliver of junk mail.  Determine which side of the sliver is the right side (which will be shown on the card).  Fold one long raw edge over, with wrong sides together.  Tape the folded sliver on to the smallest number that appears in the template, placing the folded edge aligned with the lines of the template.  Do not tape on the template.


Tip:  The project will go faster if you stop reading the junk mail.

Step 11)  Continue with another sliver, taping the sliver onto the portion with the next larger number on the template.  Make sure the sliver is long and wide enough to cover the corresponding number portion on the template.  Here's what it looks like after 3 slivers have been taped.  Note that the folded edges are aligned with the lines of the template.


Step 12)  Continue in this manner.  Here's what the frame looks like halfway through.


I'm going to flip it over to show you what it looks like so far.  If  you're not careful, you could end up with words or some undesirable picture on the front.  This is the nature of junk mail.  We are, after all, working with junk.  Also, I've found that the project goes faster if I stop admiring the advertisements. 


Step 13)  Continue taping slivers to the back of the frame.  Find some special picture for the iris.  I found a picture of a dress with a flower on it, which I will be using for the iris.


Step 14)  Tape the final piece of junk mail over the iris.  Detach the frame from the template.  Turn the frame over so it is topside up.


Step 15)  Outline the heart with a color pencil.  


Step 16)  Tie a bow and glue it to the bottom of the heart.


Step 17)  Glue the frame to the larger piece of card stock.


Step 18)  Write a note in it, and give it to someone special :) .

Wednesday, December 2, 2009

Tutorial 3--More Junk Mail X'mas Cards

This is yet another Christmas card that I made out of junk mail that needed to be reused/recycled/upcycled.  I've continued with the idea of iris folding from tutorial 2, except that this time, I decided to tape the strips to the back of the frame instead of to the front of the card.

Tutorial 
Another Christmas Card Made from Junk Mail (this tutorial is for the wreath on the left)


Materials
Thick paper for the card (I used 67 lb cover stock)--one large piece and one half its size
Junk Mail, magazine, used wrapping paper, or any pretty paper
Scotch tape
Glue
Scissors
String
Color pencil
Compasses, bowl or some circular object for drawing a circle


Time Taken
1 hour


General Idea
Cut a circular shape out of the frame, like a round Christmas ornament, or a wreath.  Tape strips of junk mail to the underside of the frame in a circular fashion.


Instructions
Step 1 and 2)  Same as in Tutorial 2.

Step 3)  Draw a circle on the half sheet of card stock (I will call this the frame).  Make sure the circle is centered horizontally.

Step 4)  Draw lines right through the diameter of the circle, at regular intervals.  I used compasses to space the lines so that each pair of adjacent lines formed a 30-degree angle.  You can just eyeball the position of the lines if you don't have compasses or a protractor.

Step 5)  Draw as big a circle as will fit onto the card, with the same center as the existing circle, ie you will have 2 concentric circles.  This step is done only to improve the speed at which you can tape the strips on.

Step 6)  Cut the smaller circle out.

Step 7)  Number the lines in a counterclockwise manner.  It doesn't matter where you start numbering.  Whether you number the lines in a counterclockwise manner or clockwise manner doesn't matter, just choose a direction and number them.

Step 8)   Cut 12 strips of junk mail, about 1.5" by 3".  Fold a raw edge of each strip to the wrong side.

Step 9)  Tape a folded strip so that its folded edge crosses:
the intersection of #1 and the outer circle
the intersection of #6 and the outer circle
Trim the strip so that you can see where each of the lines crosses the outer circle


Step 10)  Tape a folded strip so that its folded edge crosses:
the intersection of #12 and the outer circle AND
the intersection of #5 and the outer circle
Trim the strip so that you can see where each of the lines crosses the outer circle

Step 11)  Continue taping strips in a clockwise manner, trimming the access.  Whether your taping in a clockwise manner or counter clockwise manner does not matter, just make sure to choose one direction and stick with it.  As you are taping the last few pieces, you will need to overlap pieces so that the design is consistent.


Step 12)  Make sure the design looks regular from the front of the frame.  Trim off any pieces that are jutting out of the edge of the frame.

Step 13)  Glue the frame to the front of the card.

Step 14)  Tie a piece of ribbon into a bow and glue it to the bottom of the wreath.

Tuesday, December 1, 2009

Tutorial 2--Junk Mail X'mas Card

Since Christmas is getting close, I thought I would make a few Christmas cards.  I loooked around at my materials, and I again see junk mail that could be reused/recycled/upcycled.  I had read about a type of origami method called iris folding, and decided to incorporate it into my Christmas card.  This card can also be used as a Christmas ornament since it has a piece of string attached to the top.

Tutorial
Making a Christmas Card out of Junk Mail (this tutorial is for the card on the left)
Materials
  • Thick paper for the card (I used 67 lb cover stock)--one large piece and one half its size
  • Junk Mail, unwanted magazine, used wrapping paper, or any other pretty paper
  • Scotch tape
  • Glue
  • Scissors
  • Ribbon or String
  • Color pencil
  • Compasses, bowl or some circular object for drawing a circle
  • Computer Printer for printing the template

    Time Taken


    1.5 hours

    General Idea
    The ornament portion of the card is made by overlaying strips of paper to create a 3-D look.  A piece of thick paper, with the shape of an ornament cut out of it has been glued over these overlaying strips.  This tutorial is good for understanding how iris folding works, and for looking at how your card develops from the front.  After writing this tutorial, I found some templates on the internet that I could use to make the process easier, by working on the underside of the frame, building the iris backwards.  See Tutorial 10 for free instructions on using the template.

    Instructions
    Step 1)  Fold the large sheet of thick paper into half.  If the paper is too large for the card, cut it to an appropriate size.  I cut mine to 6.2" by 4.5" before folding.


    Step 2)  Cut a piece of thick paper (I used the same cover stock) to the same size as the front of the card (i.e. half the size of the paper in Step 1).

    Step 3)  Trace a circle onto the paper from Step 2.  I will call this paper the frame.  Draw a little rectangle at the top of the circle.  Cut the circle and rectangle out so you have the shape of an ornament on the frame.  It was too difficult to get my scissors around the corners of the rectangle so I didn't actually cut the whole rectangle out.  I simply folded the rectangle to the back of the frame.


    Step 4)  Lay the frame over the front of the card and locate the center of the circle.  Lightly mark this center on the front of the card, with a pencil.  This will be the center of the ornament.


    Step 5)  Cut several colorful pieces out of the catalog.  These pieces will be used for the colored portions of the ornament shown in the completed card above.  The number of pieces you cut will depend on their size.  you can always cut more later if you need more.


    Step 6)  Select a piece of colored paper and cut it into 4 strips, each 1 inch by 2 inches.  You may tear the pieces instead of using scissors.


    Step 7)  Fold the raw edge of each of the strips under.  Form a square with these folded edges; Tape each strip to the card so that the INSIDE of the strips form a square.  Place the tape on the OUTSIDE edge of each folded strip so that the tape will not be seen.  The center marked in Step 4 is the center of the square.


    Step 8)  Cut 4 strips from the leftover cover stock.  Tape these strips around those from Step 5, so the INSIDE edges form a square.  As in Step 5, tape on the outside edge of the strips.  Note that this square is bigger than the one in Step 5, and is has been rotated.


    Step 9)  Cut 4 more colorful strips.  Repeat the process of forming a square with the INSIDE edges of the 4 strips.  Note that each square is bigger and is rotated just a bit.  You can use a ruler to help make sure the square isn't a trapezoid.  I made mine without the use of a ruler.  I just eyeballed the squares.


    NOTE: Before taping junk mail, fold one long raw edge under first so the square you form will look neater.


    Step 10)  Alternate using junk mail to form a square, and leftover cover stock to form a square.  Altogether, I formed 4 squares with junk mail and 3 squares with leftover cover stock.  


    Step 11)  Place the frame over the front of the card so that the ornament looks centered, and no tape is showing.  This step is done just to make sure everything looks alright so far.


    Step 12)  Cut 3 pieces of colorful paper, preferably in a color that stands out from the rest of the ornament.  These will be used to fill in the rectangular ornament holder.  


    Step 13)  Fold these 3 pieces into squares and overlap them so that the bottom edge looks like a zigzag.


    Step 14)  Tape these 3 pieces to the back of the frame so the zigzag shows through the rectangular portion.  If the front doesn't look good, you can always remove the tape and reposition the squares.


    Step 15)  Tuck a piece of string into the upper 2 corners of the rectangle that was cut out.  Tape the ends of the string to the back of the frame.


    Step 16)  Glue the frame to the front of the card.  Outline the cut out part of the frame with a color pencil for a bolder effect.  I used a blue color pencil for my outline.

    Thursday, November 5, 2009

    Tutorial 1--Junk Mail Basket

    I get far too much junk mail.  I used to think that if I put a piece of junk mail into the recycling bin, it would get recycled into a brand new piece of junk mail.  Since then, I've learned that this is not true.  Only about 60% of, say, newsprint, can actually be turned into new newsprint.  The other 40% really does become junk.  I don't have the numbers for glossy paper from catalogs.

    I was looking for something in which to store my little odds and ends like my staple, paper clips, etc, and decided to make an eco-friendly basket out of junk mail.  I used a catalog that I didn't want.


    Tutorial
    Making a Basket out of Junk Mail


    Materials
    Unwanted catalog or magazine
    Scissors
    Optional--stapler, tape, or glue

    Time to Make
    2 hours

    Instructions
    Step 1)  Dig a catalog or magazine out of your wastebasket.  The one I dug up was 8 inches by 10.5 inches.  It doesn't really matter how big the catalog is if you are not picky about the size of the basket.

    Step 2)  Tear 9 pages of similar thickness and size from the catalog.

    Step 3)  Tear each of the 9 pages into half lengthwise.  It's not necessary to use scissors.  Just crease and tear.

    Step 4)  Fold up half an inch along the length of one strip.


    Step 5)  Continue folding up half an inch lengthwise until you have a strip that is about half an inch by 10.5 inches (or whatever the length of your catalog was).

    Step 6)  Unfold two of the last folds you made.  Refold along the creases you've already made in Step 4, starting from the opposite edge.  The purpose is to hide the raw edges of the catalog  within the strip.


    Step 7)  Repeat Steps 4 to 6 for each of the remaining strips.

    Step 8)  Place 6 of the strips vertically.  This will be the beginning of the base of the basket.

    Step 9)  Weave 6 strips horizontally, going up and down the vertical strips.  Leave small gaps (about 1/8th of an inch) between the vertical strips.  Likewise, leave the small gaps between the horizontal strips.  The gaps will make weaving easier.  After you have woven about 3 of the horizontal strips, the strips will no longer come apart as easily.  See, no hands in the following picture.  The bottom of the basket is done.


    Step 10) Now we will start forming the sides of the basket.  Fold each of the 12 strips upright where the square base ends.  This results in each strip having 2 folds.  By using your hands to hold the strips upright, you can see roughly what the basket will look like when complete.

    Tip:  Place a ruler along one edge of the square base and fold the 6 strips that are along the base, using the ruler as a guide.

    Step 11)  Now pick 2 of the unused strips.  Each row of the sides will be formed with 2 strips.  Fold 2 strips as shown.  The placement of the folds coincide with the length of each side of the square base.  Note that the 2 strips have been folded in such a way that they share 2 corners.  This will lock the square in place so it doesn't come apart.


    Step 12)  Place the overlapping part of one strip inside the other so that you get a square.  If your catalog was too short to allow 2 corners to overlap, then you can either use more strips to form the sides or use staples, tape or glue.


    Tip:  If your catalog was too short to allow 2 corners to overlap, then you can either use more strips to form the sides, or use staples, tape or glue to prevent the square from coming apart.

    Step 13)  Weave the strips sticking out of the base (from Step 9) over and under this square.

    Step 14)  Repeat Steps 11 to 13.

    Step 15)  Repeat Steps 11 and 12.  This strip will form the top edge of the basket (I'll call this strip the top square).

    Step 16)  The strips from the base will be sticking up above the top edge.  Fold each strip over the top square.  Tuck each of those strips under the top square.  If the strip is too long to tuck neatly, trim the strip first.

    Tip:  Do Step 16 for the overlapping corners (from step 12) last.